Saturday, June 22, 2013

Squared Elements by Art Gallery Fabrics

I'm so excited about this new basic from Art Gallery Fabrics
Squared Elements
The fabric will arrive early next week and I will begin shipping it out on Wednesday.
I currently  have a coupon code running thru Sunday 6/23/13 if you would like to preorder
Coupon Code SUMMERFUN 20% off for orders $35 and up.
Click here to head to the shop


I am getting these eight basic colors to carry in the shop.

Watermelon
Rosewater
Honeycomb
Lemongrass
Seafoam
Turquoise
Shadow
Noir
I think these fabrics will make a great stable fabric that is a must in any fabric stash.
I know I already have plans to use it in a Super Tote
I can see it used for the lining and sides.
I also want to make pinwheel blocks with it.
This fabric is going to be so much fun!!!

Friday, June 21, 2013

Kids Apron Tutorial

My niece's birthday is coming up soon and I needed to figure out what to make her for a present.  I have really been trying to hard to go on a fabric diet and only use the fabric I have on hand.  I've been very happy/surprised how well the last couple of projects have turned out by using only what I have in my fabric stash.  I remembered that a few years ago I bought a stupid amount of this stretch denim.  So the challenge was on...What could I make a 3 year old out of denim that wasn't clothes?  The next best thing...an apron!  I took pictures as I went hoping it would turn out well enough to make a tutorial.
And it did!


So here is the tutorial

1. Pick out your fabric:  I used stretch denim and two prints from Color Me Retro by Jeni Baker
The main fabric piece should be at least 18" x 19" (a fat quarter would be perfect)
Accent fabric 5.5" x 42" for making double fold bias tape.  If you prefer use pre-made bias tape!
Fabric for embellishments or whatever else you want to use to spiff this apron up.
*Dimensions were used to fit a 3 year old.  You may need to adjust the length of your fabric if you are making for an older child.


2.  Cut the fabric to 17" x 18.5" and the fold in half long ways, right sides together.


3.  On the short side make a  mark 3.5 inches in from the folded edge


4. On the long side make a mark 8 inches down from the edge that you made the first mark on.


5.  Using a flex ruler if you've got one (or just eyeball it if you have to) draw a curve that connects the two points you marked.  Make sure the curve intersects the end of the fabric at a right angle at both marks.


6.  I know it's hard to see in this picture but you should have something like this.


7.  Use your rotary cutter to cut out the curve.


8.  When you open up the fabric this is what you should have.
9.  Use your favorite method for making double fold bias tape.  I cut 3 stripes of fabric 13/4" wide by the width of fabric.  Sew the ends together to make one long strip and then put it through my bias tape maker tool.  Then I folded the fabric in half lengthwise and ironed well.  I then cut my strips to length as needed in the following steps.


 10.  Measure the sides of the apron from underneath the armholes to bottom of the apron.  Cut a length of bias tape to fit that side.  Topstitch the bias tape close to the open edge making sure to encase the raw edge of the apron. Repeat for the other side.  Do the same for the very top (neck) part of the apron.  If desired topstitch along the folded edge of the bias tape for a finished look.


11.  Measure the bottom edge of the apron.  Add 1" to that length.
My measurements were 17" + 1" = 18"
Open up bias tape to fold the raw edge in 1/2".  Press and then refold tape back in half.  Press again.  Do the same for the other end of the bias tape.


12.  Now when you attach the bias tape to the bottom of the apron you are also covering the raw edges of bias tape you just sewed onto the side.  


13.  To make the apron neck and ties you will need one length of bias tape 61 inches long.  Do the same thing to each end as you did in Step 11.  Fold in the raw edges and press.  Measure from each end 10.5" and mark.  This is where you will attach the bias tape to the apron.


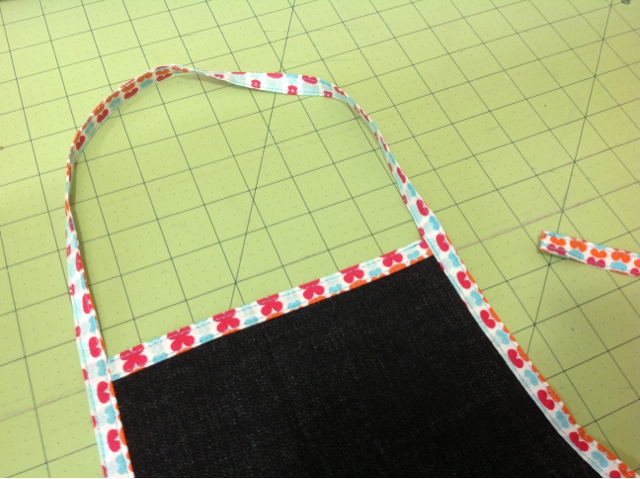
14.   Starting at the point you just marked, begin pinning to the armhole of the apron.  Once you make it all the way up to the top of the apron, start again on the other side.  You should have a loop left up at the top big enough to get the kid's head through. 
*Make sure you don't get the bias tape twisted up at the top.


You should have something that looks like this.


15.  Start at one end of the tie and topstitch close to the open edge all the way up the apron, around the neck, and down the other side. Making sure to enclose the raw edges of the armholes.  Also topstitch the other side of the ties if desired for a finished look.


16.  All sides should be covered with bias tape  now and you should have a functioning apron.  The nest step is to embellish the apron if you so choose.  The possibilities are endless!


I chose to do an applique flower.  I didn't use any kind of template.  I just simply drew out one petal on a piece of paper and then cut it out to use as a pattern to cut out the fabric.  I placed the petals on the apron and use a bit of glue to hold them in place while I edge stitched around each petal.  I found a round item to draw around for the middle circle (I found a roll of washi tape that was the perfect size).  I cut the circle out and edge stitched around it.  That's it!


I hope this all makes sense.  But if not, don't hesitate to ask a question.  I would also love to see any finished projects.  Feel free to post a photo to my facebook page of what you created.

And one last thing... Over at my Esty shop I'm having a sale on everything in the shop.  Just use Coupon Code SUMMERFUN2013 for 20% off $35 or more good thru Sunday 6/23/13.

Wednesday, May 22, 2013

Medallion Quilt Top Done!

With classes all done I finally was able to get working on the Marcelle Medallion Quilt again.
For those of you who don't know about this awesome quilt it is from Liberty Love
A book by Alexia Marcelle Abegg.
It's a great book with 25 must do sewing projects including quilts, clothing, and bags.
There are even a few projects for the hubby and Fido too!

At first I thought I would do each boarder in a different fabric collection/color.
But, I just fell in love with the way Shelburne Falls, Pearl Bracelet, and Architextures
worked together.
So why quit a good thing?
 I just kept going with it and used up all my stash of that great
 crosshatch from architextures :(

Liberty Love

I thought that the cross block border would be my least favorite out of the whole quilt.  
Turns out it was my favorite!
Of coarse as soon as I laid it out Sophie had to come test it out.


As I was attaching the last boarder it dawned on me that now I have to figure out how to quilt it.
oh no!  What to do?

 by Half Stitched

Overall I really loved piecing this quilt.  I was shocked how forgiving the piecing was.  There is more than one seam that didn't quit match up and even a pearl bracelet piece or two that is even sewn in wrong side up. shhhh...don't tell anybody.

While I'm trying to figure out how I want to quilt this thing I'm preparing for the local monthly craft show in town.  I'm trying to figure out what I would like to make for it.  I have a few quilts that I will sell but I need more than just a few quilts.
I made a few bags like these...


Have you ever sold at an art market? 
What types of items sold the best for you? Or what have you bought that was a must have ?
I would really appreciate any input!!!

Saturday, May 11, 2013

Sew, Mama, Sew! Giveaway Winner

The Sew, Mama, Sew! Giveaway was so much fun.  
I couldn't believe I got almost 800 entries.
That's a new record for me.

The winner of the Chevron Fat Quarters is...
 Hannah who said
Thank You so much to everyone that entered!  It was great reading everyone's comments.  While I was trying to rely back to each comment it became clear to me really quickly that was not going to be possible.  I hope every one had a great time with the giveaway and I look forward to doing more in the future.

If you haven't done so already please check out my Etsy Shop here!  I am offering a 10% discount for those who entered they giveaway.  Just enter coupon code GIVEAWAYDAY during checkout to receive the discount.  The coupon code expires Wednesday May 15th , 2013.  So hurry!

Monday, May 6, 2013

It's GiveAway Day! with Sew, Mama, Sew!


This GiveAway is NOW CLOSED 
Click Here to see the winner.
It's Sew, Mama, Sew! GiveAway Day!!
I would like to share a little about myself for those that are new to my blog.
I'm a graduate student by day and a Etsy shop owner by night.
I sew whenever I get a chance.
I mostly have been making quilts lately but started off sewing clothes for my nieces.
I just recently started learning QAYG or quilt as you go.  
Here is my latest QAYG endeavor.


I also have been playing around with paper piecing.
A couple of weeks ago I made this beauty.


I can't wait till all my classes are done so I can get back down to business on my Marcelle Medallion Quilt.  I've made it to the 3rd border so far. (but I don't have it shown in this picture)


But I know your thinking where is the giveaway already...


I'm loving the new Chevron colors by Riley Blake and since I sell fabric on Etsy, of coarse that's what I'm giving away.


The Giveaway is half yard cuts (2.5 yards total) of each new chevron color by Riley Blake.
International entries welcome!
Just leave a comment to enter.
I would love to hear about what types of fabric you are buying right now.
(bright, geometric, blenders, a specific collection, or brand just for some examples)

Also, if you are one of my facebook fans I would love to give you an extra entry so just leave an additional comment saying your a fan.
If you not a facebook follower you can follow here!


Giveaway ends at 5:00 PM PST on May 10th
Winner will be announced on May 11th
Good Luck!

Saturday, April 20, 2013

Paper Piecing My Way to A Brighter Day

Wow, what a week. I don't know about you but I have been on CNN overload watching all that has been happening across the US. I needed to take a step back away from the tv and try to concentrate on something more positive and bright.

I searched the internet for some inspiration and I found this cute little butterfly paper piecing pattern on Craftsy. Its been awhile since I have done any paper piecing and I had to break out a book to help me remember how.


Even with the book, i still messed up and sewed the fabric to the wrong side...I've never been good a reading directions.  Thank God for seam rippers right?  I finally got into the groove and picked out some bright and pretty tonal fabrics form Art Gallery and Robert Kaufman.


At first I thought this would be a nice sort of mindless sewing project that I could do while still keeping one eye on the news.  But after ripping out more than one seam and a few missed pieces altogether, I really needed to focus.


Believe it or not the toughest part to this pattern was piecing the butterfly body piece.  Of coarse it was getting late by that point and everything was getting a little harder to do.


This is by bright little butterfly.  Now I need to decide what I'm going to do with her.


I think I will put her on some Essex Denim.  What do you think...pillow?...bag?...

Friday, April 12, 2013

I Need Your Vote!!

Recently i entered the AccuQuilt Barn Quilt Design Contest.


Wednesday i got an email saying one of my blocks
 was chosen to be apart of the top 100.

I'm so excited!

Now voting is open to the public
 and i would be honored if you would vote for my block.

Block #41
This is my block #41 in the voting.

The winner will have their block displayed at AccuQuilt's headquarters 
as well as a trip to attend the unveiling.

I would love to win!!
To vote just click here
Hurry voting ends April 17th!!
09 10 11 12
Blogging tips